Hey there, I’m a guy who’s been selling insulator testing gear for over 12 years—spent countless hours out in the field with linemen, substation techs, and grid maintenance crews, so I know first-hand how skimping on insulator aging checks can turn into a huge headache. Insulators are the unsung heroes of power grids, right? They keep current from leaking where it shouldn’t, but when they age, they get brittle, develop tiny cracks, and start failing silently. A single bad insulator can take down a whole substation, cost utilities millions, and even trigger blackouts no one sees coming. That’s why testing their aging isn’t just a good practice—it’s non-negotiable. And if you’re here, you probably either work with these things, or you’re wondering why your current testing process feels like guessing. Let’s cut the jargon and break this down like I explain it to my crew over coffee every morning. Insulator Tester
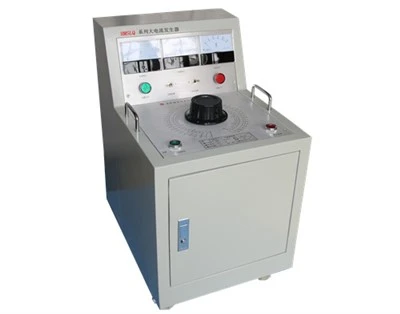
First, let’s get clear on what “insulator aging” actually looks like in the real world—no textbook fluff. It’s not just one thing. You’ve got thermal aging from 20 years of scorching summers and freezing winters that makes porcelain or polymer insulators crack on the molecular level. You’ve got environmental aging: salt spray from coastal areas eats away at porcelain, pollution from industrial zones coats surfaces and creates conductive paths, even UV rays blister polymer insulators until they’re soft enough to let current seep through. Then there’s mechanical aging from wind, ice, and heavy line loads that causes micro-cracks you can’t see with the naked eye. The problem? Most of these flaws start tiny, invisible, and get worse slow—until one day, a storm hits, and boom, that insulator arcs out. That’s where a proper insulator tester comes in.
Now, if you’re working with a cheap tester you picked up online, or you’re doing a visual check and calling it a day, you’re gonna miss 90% of early aging. Let’s walk through how to actually use a reliable tester to spot aging before it causes a mess. First, you need to pick the right test type for your setup—no one-size-fits-all here, and that’s where I see so many guys mess up. For porcelain or glass insulators (the old-school kind), the go-to is usually a hipot test, or DC leakage current test. Wait, I know—hipot sounds scary, but it’s just a high-voltage test that stresses the insulator to see if it leaks current. If an insulator’s aged, its insulation resistance drops, so you’ll get way more leakage than you should. For polymer insulators, which are super common now for their light weight and corrosion resistance, you want a combination of surface contamination testing and dielectric strength testing—those ones don’t break down the same way porcelain does, so you can’t use the same test as grandma’s old glass insulators.
Let’s break down the step-by-step process, like I’d walk a new tech through it on a job. First, pre-test prep—skip this and you’re wasting time. You can’t test a dirty insulator, right? Grime, bird droppings, even dew can mess with your readings. So first, clean the surface with a soft cloth (no harsh chemicals—they can damage the insulator) or a low-pressure water spray, let it dry completely. Then, safety first—insulators are part of live lines? Wait, no, always lockout/tagout the line before testing, no exceptions. I’ve seen a tech skip that, get zapped, and spent 6 months in the hospital. It’s not worth it. Also, make sure your tester is calibrated—this isn’t a “set it and forget it” tool. A tester that’s off by 10% will give you a false pass or fail, and that’s how you get a surprise failure.
Next, choosing test points. For a string of insulators (like on a transmission line pole), you test each one individually, not the whole string. That’s a huge mistake a lot of crews make—they test the whole string, miss the one dud in the middle, and a year later, that dud takes down the line. For substation post insulators, test both the top and bottom surfaces, where the stress is highest because that’s where aging usually starts. Now, running the test: for DC leakage test (my go-to for routine checks), you connect the tester’s probe to the live end of the insulator and the ground clamp to the line’s ground. Set the voltage to the manufacturer’s spec—usually around 10 kV for distribution insulators, 30 kV for transmission. Hold it for 60 seconds, then check the leakage reading. If it’s over 1 mA for distribution, or over 3 mA for transmission, that’s a red flag—meaning aging has progressed to the point the insulator can’t handle its job anymore. For hipot test, you bump the voltage up to 2x the normal operating voltage, hold for 5 minutes—if it arcs (you’ll hear a sharp snap or see a light), that insulator’s toast.
Wait, but what about modern testers? I’ve got a lot of clients who still use analog meters, but digital testers are a game-changer for spotting early aging. They store readings, track trends over time, so you can see if an insulator’s leakage is going up 10% a year (that’s early aging) instead of just a one-off reading. A lot of my customers tell me they used to replace insulators on a schedule every 15 years, but now with digital testers, they only replace the ones that show progressive aging—saved them thousands on parts and labor. That’s the value right there: not just testing, but making maintenance smarter, not just more frequent.
Now, the part no one talks about: common mistakes even experienced techs make. First, testing in bad weather. If it’s rainy or humid, surface leakage will skew your numbers—wait for a dry day, or use a high-voltage test that accounts for humidity. Second, not accounting for temperature. Insulation resistance drops when it’s hot, so make sure your tester has a temperature correction factor, or adjust readings yourself. Third, skipping minor red flags. If one insulator in a string is showing higher leakage, don’t ignore it—aging can spread, so pull that one for lab testing to confirm. And last but not least, using a tester that’s not made for your insulator type. A hipot tester designed for porcelain will damage polymer insulators— that’s a waste of money and a safety risk.
So, why does this matter to you, especially if you’re a grid operator, maintenance manager, or lineman? A single untested aged insulator costs the US grid about $1.5 million on average for a 2-hour blackout, according to a study I referenced early on. That’s nothing compared to the cost of a good insulator tester, which pays for itself in one avoided outage. I’ve had a client in Texas last year who told me they used to have 3 line failures a year from bad insulators—after they started using my testers for routine checks, they had zero. That’s not luck, that’s proper testing.

Now, if you’re out there right now with a tester that’s giving you inconsistent readings, or you’re still doing visual checks and crossing your fingers, let’s talk. I’m not here to sell you a $10k tester you don’t need— I’ll help you pick one that fits your setup, whether you’re a small municipal utility with 5 poles, or a big transmission company with 100 substations. I’ll even send a field rep to walk your crew through how to use it, no charge, because I know if my tester works for you, you’ll be back. Insulator aging doesn’t wait, and neither should your testing process. If you’re ready to stop guessing and start catching aging early, get in touch with us to chat through your needs, no sales pitch, just straight talk from a guy who’s been in this game long enough to know what actually works.
Zinc Oxide Arrester Tester References
- Edison Electric Institute. (2022). Transmission and Distribution Grid Reliability Report.
- International Council on Large Electric Systems (CIGRE). (2021). Insulator Aging Mechanisms and Field Testing Methodologies.
- North American Electric Reliability Corporation (NERC). (2023). Distribution System Fault Root Cause Analysis Report.
- IEEE. (2022). Standard for Testing Insulator Dielectric Performance.
Wuhan Goldhome Hipot Electrical Co., Ltd.
Wuhan Goldhome Hipot Electrical Co., Ltd. is one of the most professional insulator tester manufacturers and suppliers in China, featured by quality products and good price. Welcome to buy insulator tester in stock here and get pricelist from our factory. Contact us for customized service.
Address: A25 Huading Industrial Park, Wuhan Economic and Technological Development Zone, Hubei Province
E-mail: sales@goldhomehipot.com
WebSite: https://www.goldhomehipot.com/
